Developer
Working with Git Workflow for Multiple Environments
Introduction
Content management is undergoing a shift towards two primary headless alternatives: Git-based and API-driven. Nimvio belongs to the category of API-driven headless CMS. An API-driven CMS provides users the flexibility to select their preferred framework and programming language for their work (see Headless CMS Overview).
In this guide, our utilization of Git will diverge from the typical content management approach seen in Git-based headless systems. Instead, we will employ Git for the management of the website frontend's code.
Challenges
Utilizing an API-driven CMS like Nimvio can rapidly result in complexities when it comes to appropriate versioning. The following questions arise: How are changes effectively managed? What methods facilitate collaborative work through shared workflows? How does it adeptly manage diverse operational environments? Let's delve into these queries.
Managing Changes
As Nimvio functions as an API-driven headless CMS, content changes can be effectively handled through the built-in version control within the Nimvio content system. For detailed guidance, please consult the Nimvio Version Control Guide.
Simultaneously, for the website head part/frontend codes, Git serves as the standard version control method for managing code changes. So different content version can be associated to different codes version too.
Collaborative Workflows
Implementing content workflows within Nimvio is a streamlined process. Refer to the Nimvio Workflow Feature Guide for comprehensive instructions on creating and applying workflows.
Meanwhile, within the Git context, the common workflow is Gitflow. Gitflow introduces a develop branch into the mix. This kind of git workflow is pretty common when dealing with headless CMS and combined with Nimvio workflow will enable effective collaboration between conten writter and developer.
Environment Handling
For addressing diverse environments, Nimvio provides an option to create environments where you can take snapshots of your content. These snapshots can be from your production environment or other environments. By using non-production environments, you can modify the content template and content without any impact on what your customers see in the production environment. Please refer to Working with Multiple Environments Guide which provides step-by-step guidance.
On the code side, the git branching will enable code segregation between different environments. By adopting gitflow as the workflow, we can have a 1:1 map betwen content environment in Nimvio, with the related code branch. For example, code changes are merged into the develop branch, and when a new version is ready for release, it's merged into the main branch. This maintains the main branch as the most up-to-date code version for production.
In this guide will demonstrate the process of efficiently managing versioning, workflows, and environment for both content and frontend code components.
Example
Let’s start with the content created from the Getting Started Guide where content template homepage has Headline, Body Text and Picture.
What we will do:
- Step 1: Create new environment
- Step 2: Switch environment
- Step 3: Edit existing content template
- Step 4: Update content
- Step 5: Get environment ID
- Step 6: Checkout new Git branch
- Step 7: Change HTML code
- Step 8: Change JavaScript code
- Step 9: Check the result
Step 1: Create new environment
First thing first is to create new project environment. Go to menu Settings -> choose Environment -> Click on "+ Create Environment". We can name it anything we want, but in this example we will name the new environment as Development.

Step 2: Switch environment
Before we can make changes to our environment, we need to switch it first. Let's do it by clicking on Project Dropdown -> choose the Project we are working on then select the desired environment (Development).

Step 3: Edit existing content template
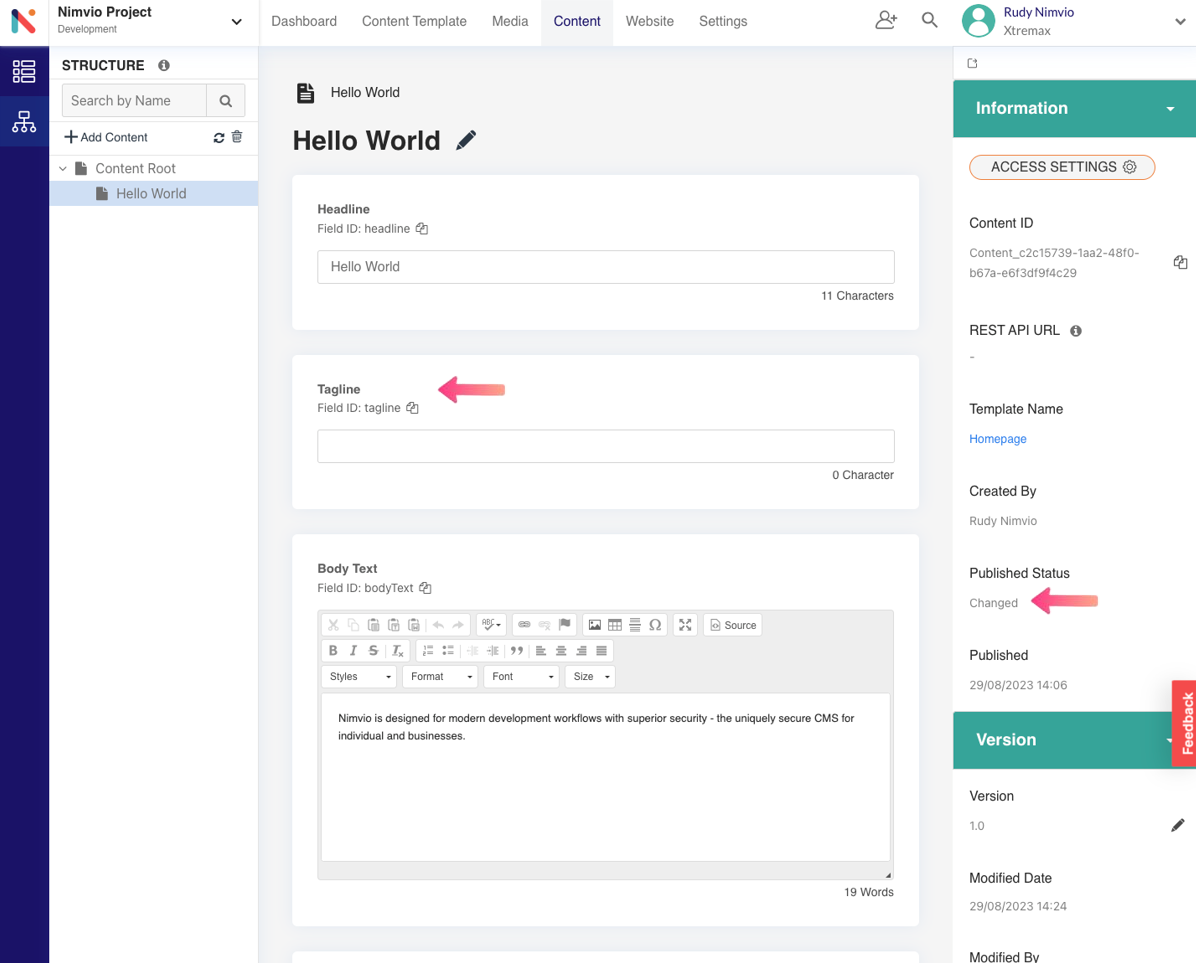
Let's add a new text field to the Homepage template from the Getting Started guide. In this case, the new text field name is Tagline.

Step 4: Update content
The action on updating content template will make the "published status" of any content that use the template to become Changed. Now go to "Hello World" content and fill in the Tagline field with any text you like. Don't forget to "Save & Publish" the content before continue to the next step.
Step 5: Get environment ID
To be able to view the latest content for Development environment that we've just created, we will need to get the Environment ID.
Navigate to menu Settings -> Click on General -> Copy and save the Environment ID.

Step 6: Checkout new Git branch
Since we will sync content for the new project environment in Nimvio with the respective Git branch, then we will need to checkout a new branch in frontend code repository.
Make sure that the HTML and JavaScript code from the Getting Started guide are exist in your local frontend repository and being Git tracked before executing this step.

Step 7: Change HTML code
Inside the Development branch, change the HTML code by adding new HTML element related with the new content field.

Step 8: Change JavaScript code
The same step applies to the JavaScript code, we need to make some necessary changes to handle new content field. In this step you will need the Environment ID from Step 5.

Step 9: Check the result
See the changes in your local environment. Make sure that the update to templates, contents and codes are reflected.

What's Next?
Congratulations! You have finished the guide on working with Git Workflow for Multiple Environments. In this guide, we show you how to combine Nimvio project environment with Git branching worflow to handle multiple website environments. Keep exploring others below: